Managing files associated with BOM components
Use the Source tab to manage the files associated with BOM components. Common cases include:
-
Analyzing and identifying unmatched files. Unmatched files can be related to a component, a proprietary component, or a third-party component. Review these files to determine if they must be matched to a component version or if they can be excluded.
-
Validating files that were matched to a component. Review these files to determine if they were matched to the correct component version or if they were incorrectly matched. Incorrectly matched files can be associated with the correct component version or excluded.
Accessing the Source tab
You can access the Source tab to view all files in a project or automatically filtered to view specific matches.
-
Select the project name using the Watching or My Projects dashboard. The Project Name page appears.
-
Select the version name to open the Components tab and view the BOM.
- Do one of the following:
Select the Source tab to view all files in this BOM.

Select an item in the left pane to see information in the table.
Select a value in the Match Count column to view the Source tab filtered to that component.

About the Source tab
The Source tab consists of:
-
A left pane which shows the tree structure of the files. Use this pane to navigate and select the information shown in the table.
Select an item in the left pane to display the information in the table for the selected item.
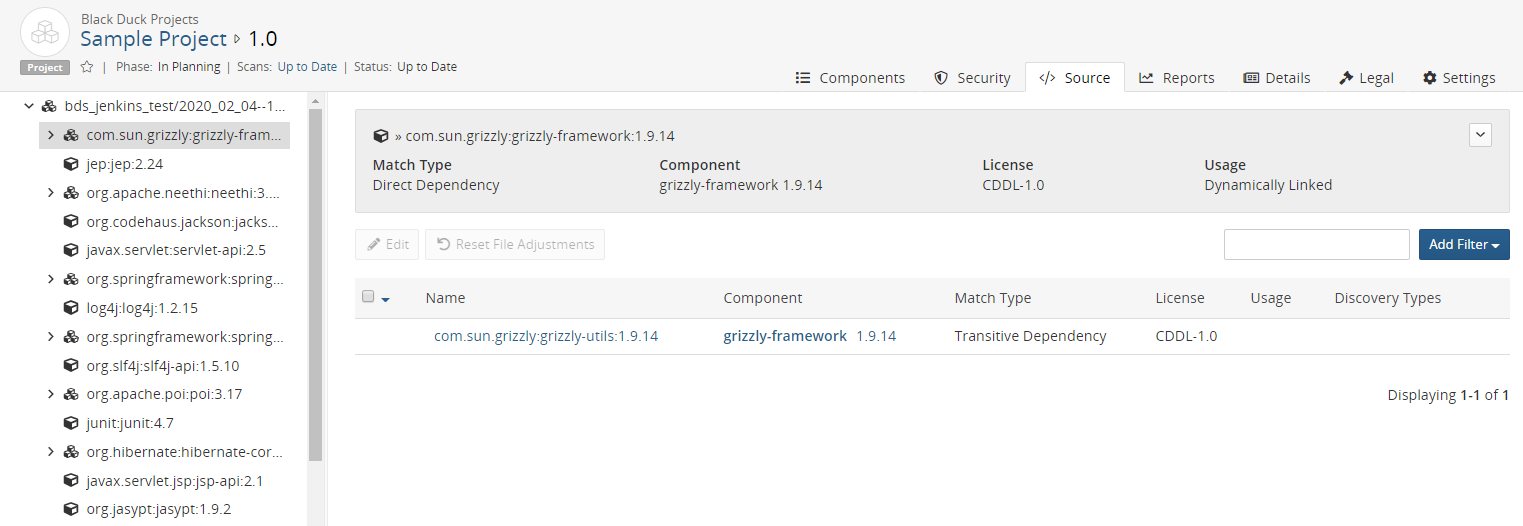
Selecting to view an archive:

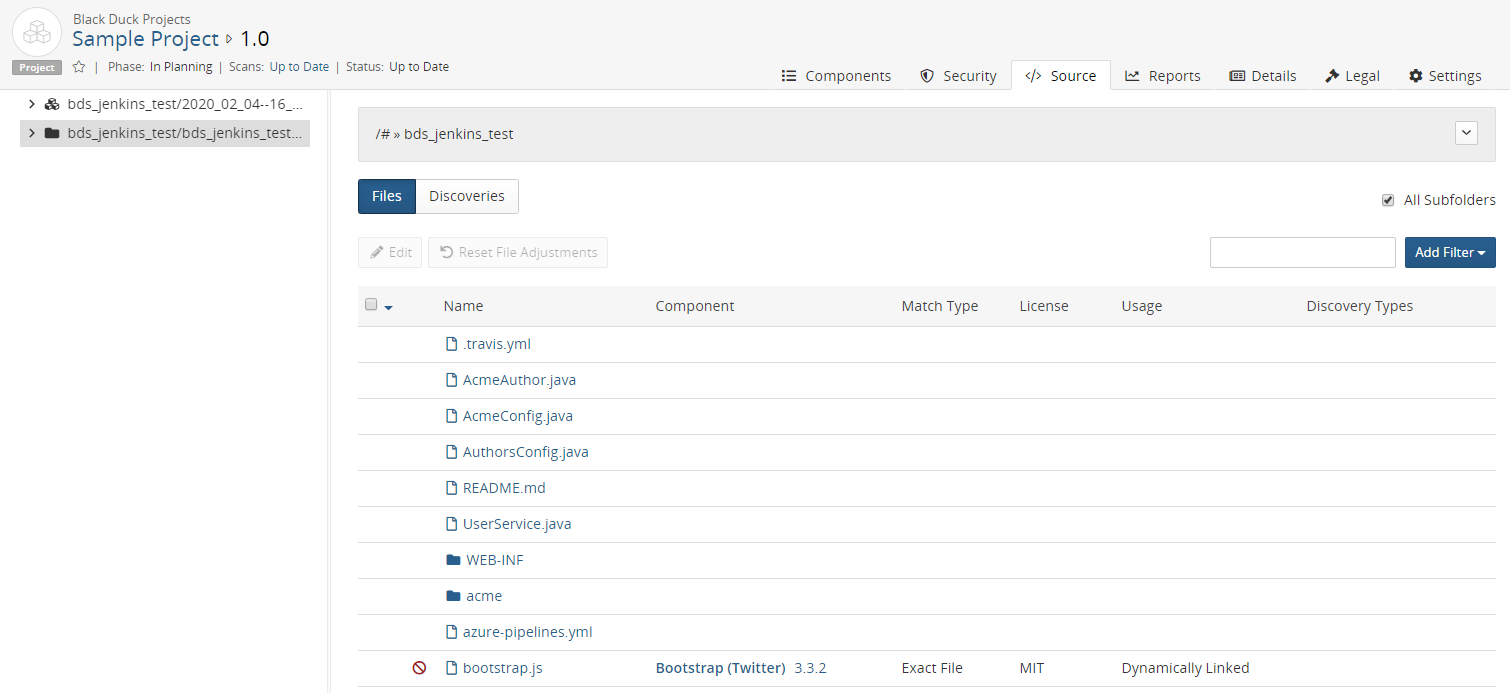
Selecting to view a folder:

The table displays the files/directories directly under the selected item in the left pane.
Information about the selected item, such as the component name and version, path, and scan size appear above the table.
Click
 and select Copy path to copy the path to your clipboard.
 -
A right pane which displays the following information:
-
A header banner containing relevant information for the selected component such as the file name or namespace for the component. In the case of imported SBOM files, the banner will contain information such as the SBOM specification (SPDX or CycloneDX), when the SBOM was imported, who supplied the SBOM, and the version of the tool used to create the SBOM.
-
A table which provides the following information on the item selected in the pane:
-
Name.
Select the name to filter the information shown in the table. The item you selected is also highlighted in the tree shown in the left pane.
-
Component. Name and version of the OSS component in use in this version of your project.
Select the component name or version to open Black Duck KB component version page which displays more information of the component version, such as a list of the projects and project versions in which this version of the component is used.
-
Match type. Indicates how the match between the component in use in this version of your project and a specific version of a project in Black Duck KB was made.
-
License. Declared license of the component in use in this version of your project.
-
Usage. Indicates how this file is intended to be included in the project when this version is released. Click here for more information on usage.
-
Discovery Types. Indicates the type of discovery. Possible values of License and License Reference are for embedded licenses detected during the scan.
-
-
-
Filters located above the table, to filter the information shown on the tab.
-
Check box located above the table, to view subfolder information. Select All Subfolders to include information on all subfolders and files.
-
Files/Discoveries tab to view files or discoveries. Select Discoveries to view embedded license information detected in the scan.
The tab uses the following icons:
-
 Package manager scan/archive
 -
 or
or  Signature scan/directory
 -
Empty dependency tree - which contains no OSS matches
-
 or
or  File
File -


 Snippet
information. Click here for more information.
 -
 Source file. Used when reviewing snippet matches and detected embedded licenses.
Modifying matches
To modify a match:
-
Open the Source tab as described above.
-
Select one or more items in the table and click
 located above the table.
 -
In the Edit Component (if you selected one item) or Bulk edit (if you selected multiple items) dialog box, modify the component, version, origin ID, and/or usage.
Click here for more information about modifying snippet matches.
-
Click Update.
Identifying unmatched components
An unmatched component means that it was not possible to match the stated external identifier to a component in the Black Duck KnowledgeBase. The external identifiers in the KnowledgeBase are taken from the public Forges, like Maven Central, etc. Unmatched components found in the BOM Import log can also be seen in the Source view of a scan. You can triage these components and either identify them to a KnowledgeBase component or create a custom component and associate it with the components.
- Open the Source tab as described above.
- Click the root folder of the scan in the left-hand panel of the Source view.
-
Select one or more entries and click
 . The Edit Component dialog box (if you selected one item) or Bulk
Edit dialog box (if you selected multiple items) appears.
. The Edit Component dialog box (if you selected one item) or Bulk
Edit dialog box (if you selected multiple items) appears.-
If the component already exists, enter the name in the Component field and specify a version.
- If the component does not exist, create a custom component first before completing this step.
-
-
Click Update.
A
 appears in the BOM in the row of the component you selected to
indicate that a manual adjustment was made to this file. The match type
changes to Manually Identified Package.
Identifying unmatched files
-
Open the Source tab as described above.
-
Click
 and select Match type > Unmatched and click
OK.
 -
Select one or more entries and click
 . The Edit Component dialog box (if you selected one item) or Bulk
Edit dialog box (if you selected multiple items) appears.
. The Edit Component dialog box (if you selected one item) or Bulk
Edit dialog box (if you selected multiple items) appears.-
If the file is part of a component that is in use, enter the name in the Component field and specify a version.
-
If the file should not be included in the project, select Dev. Tool / Excluded from the Usage list.
-
-
Click Update.
A
 appears in the BOM in the row of the component you selected to
indicate that a manual adjustment was made to this file. The match type
changes to Manually Identified.
Validating matched files
-
Open the Source tab as described above.
-
Click
 and select Match Type >
Type of match(es) and click OK.
 - Select one or more entries and click
 . The Edit Component dialog box (if you selected one item) or Bulk Edit
dialog box (if you selected multiple items) appears.
. The Edit Component dialog box (if you selected one item) or Bulk Edit
dialog box (if you selected multiple items) appears.If the file was incorrectly matched to a component during the scan, enter the new name in the Component field and specify a version in the Version field.
If the file was incorrectly matched to an origin or origin ID, specify a different value using the Origin and Origin ID fields.
If the file should not be included in the project, select Dev. Tool / Excluded from the Usage list.
-
Click Update.
A
 appears in the BOM for this component to indicate that a manual
adjustment was made to this file.
Resetting files and components
You can revert manually adjusted files and components to their original match type.
This option is not available for unmatched files and is not enabled if the file cannot be reset.
-
Open the Source tab as described above.
-
Click
 and select Adjusted.
 -
Select one or more files or components and click Reset Adjustments.
If you select multiple files or components, only those files that can be reverted are reset.
-
Click Save.
Deleting files from a BOM
You cannot delete files that were automatically added to a component. You can ignore a component in the BOM that contains the file so that it is not included when calculating the security, license, and operational risks for this version of your project.
To remove an automatically-added scanned component from a project version's BOM, you must remove it from your source code or Docker image and then rescan that code or Docker image. This will automatically update the project version's BOM to reflect only those component's that were automatically discovered in the mapped scans and manually added to the BOM.
To remove an automatically-added component from a Protex BOM, you must remove it in Protex and then use the Protex BOM tool to re-import the Protex BOM. This will automatically update the project version's BOM to reflect the changes in the Protex BOM.
